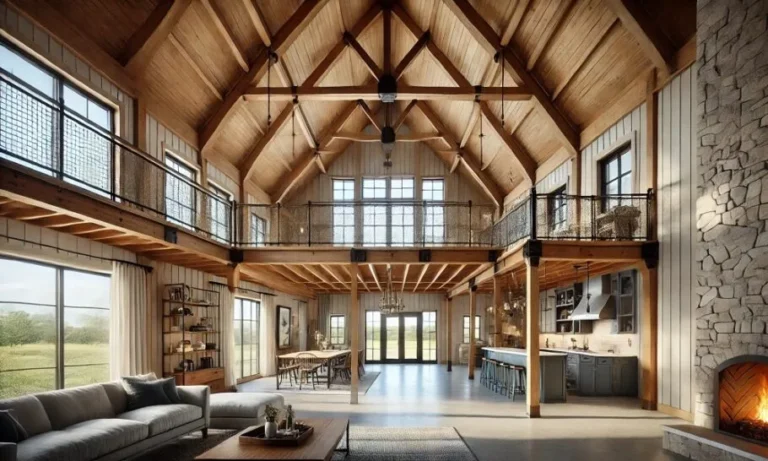
Barndominium Ceiling Design Ideas: Stunning Details for a Warm, Modern Interior
Choosing the right barndominium ceiling design is one of the most important interior decisions you’ll make. It’s not just a finishing touch; it defines the entire feel, function, and character of your space. Get it wrong, and the room can feel cramped or echoey.
Get it right, and you unlock the true potential of that wide-open barndo layout.
Per the International Residential Code, the minimum ceiling height for habitable rooms is 7 feet, but most barndominiums blow past that to 10 feet or more. This extra vertical space is your canvas, but it also introduces unique challenges with lighting, insulation, and acoustics that you don’t face in a standard home. Let’s break down what you’re really looking at so you can make a choice you’ll love for years.
Quick Answer
Your barndominium ceiling design determines your home’s atmosphere and practicality. Exposed trusses offer dramatic, industrial character and easy maintenance access. Vaulted ceilings create a bright, airy feel but can be costly to finish.
Wood planks or shiplap add warm, rustic charm. A flat drywall ceiling provides a clean, modern look and the best acoustics. Your choice depends on your budget, desired style, and how you’ll use the space.
Always check local building codes for minimum height requirements first.
The Look Up: Why Your Barndominium Ceiling is a Make-or-Break Decision
Think of your ceiling as the fifth wall. In a barndominium, it’s often the largest, most visible surface you see. Unlike a conventional house where ceilings are often an afterthought, your barndo ceiling is a central architectural feature.
It’s the element that either celebrates the building’s unique structure or conceals it to create a more traditional living environment.
Your decision here impacts everything else. It sets the budget for insulation and finish work. It dictates your lighting plan and fixture choices.
It controls how sound travels in your great room. And most importantly, it establishes the visual tone. Do you want a space that feels like a modern, airy loft or a cozy, rustic retreat?
That feeling starts overhead. Getting this foundational choice right makes every other design decision down the line much simpler.
A Visual Tour of 6 Popular Barndominium Ceiling Styles
You’ve got more options than you might think. Each style has a distinct personality and comes with its own set of practical considerations. We’ll look at the most common approaches, from the purely structural to the fully finished.
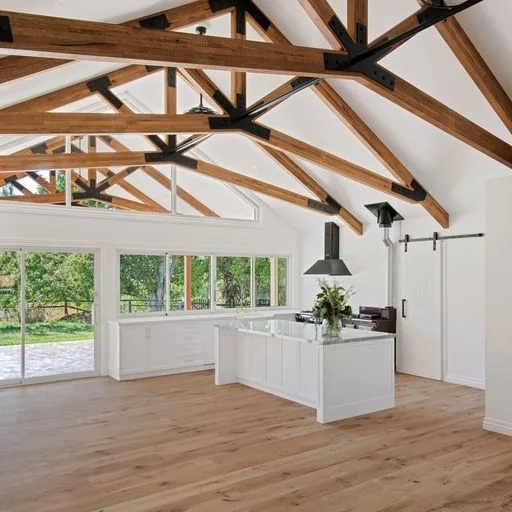
Image source: Bing (Web (fair-use with source credit))
The Classic: Fully Exposed Trusses
This is the quintessential barndominium look. It leaves the roof’s structural skeleton, the wood or steel trusses, completely visible. You see the triangles, the gusset plates, and the raw wood or metal framing against the underside of the roof deck.
Visual Impact: It’s bold, industrial, and honest. It celebrates the building’s purpose and creates incredible drama, especially with scissor trusses that create a vaulted effect.
The Reality: This is often the most cost-effective option upfront, as you’re not paying for materials to cover everything up. However, you trade that for other considerations. Insulation becomes a puzzle (often solved with spray foam on the roof deck), dust will settle on those horizontal members, and the open space can be an echo chamber.
It’s a perfect fit if you love the authentic, unfinished look and want to keep mechanical systems easily accessible. For more ideas on blending this raw aesthetic with comfortable living, our look at modern rustic interiors has some great crossover tips.
The Modern Tilt: Vaulted or Tray Ceiling
A vaulted ceiling follows the roofline upward, creating a soaring, peaked interior volume. A tray ceiling is a variation where the center is raised, often with a flat perimeter. Both styles use drywall, wood, or other finish materials applied directly to the framing.
Visual Impact: This is all about grandeur and light. The added height makes any room feel larger and more open. It’s a fantastic way to bring in more natural light if you add windows or skylights high up on the walls.
The Reality: The “wow” factor comes with a price. Finishing a high, angled surface is more labor-intensive and requires special equipment like drywall lifts. Heating and cooling that large volume of air can be less efficient, so your HVAC system needs to be planned accordingly.
The acoustics are similar to exposed trusses, sound travels and echoes. But if your goal is a bright, expansive feel that leans more towards a custom home than a workshop, this is a top contender.
The Cozy Touch: Wood Plank & Shiplap
Here, you’re covering the ceiling structure with finished wood. Tongue-and-groove (T&G) boards, shiplap, beadboard, or wide planks are installed, usually running perpendicular to the ceiling joists or trusses.
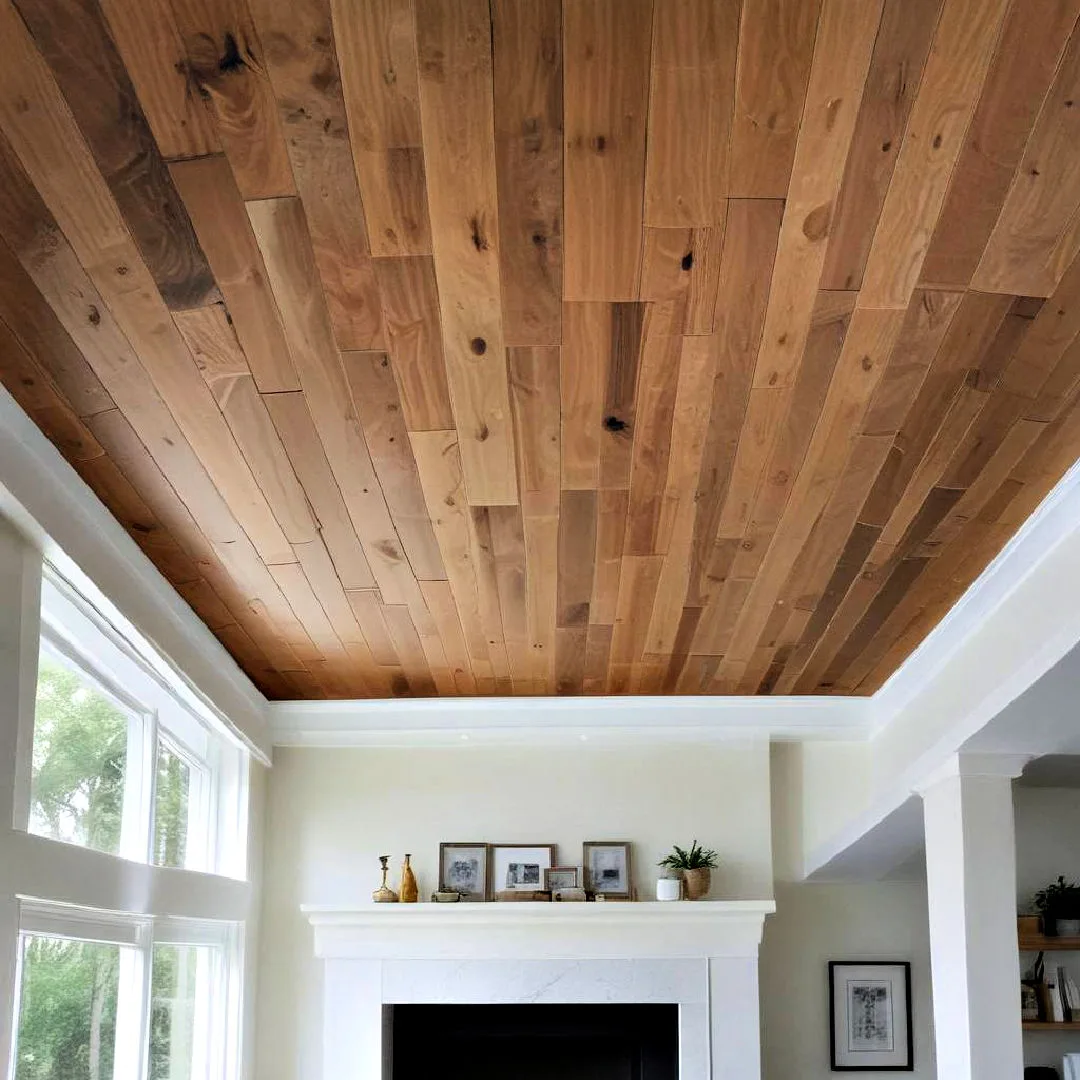
Image source: Bing (Web (fair-use with source credit))
Visual Impact: Warm, inviting, and timeless. It adds incredible texture and can range from rustic (knotty pine) to refined (clear, painted cedar). The linear patterns can make a room feel longer or wider, depending on the direction of the planks.
The Reality: Wood is a fantastic insulator against sound, which helps dampen echo. The cost is higher than drywall per square foot for materials, but installation can be a more approachable DIY project. You’ll need to decide on a finish, paint, stain, or a clear sealant, which adds to the maintenance schedule.
It’s a beautiful way to add character and works exceptionally well in bedrooms, living areas, and to define a cozy cabin-inspired space within a larger open plan.
The Industrial Edge: Corrugated Metal
This style uses the same corrugated or ribbed metal panels often found on the exterior, but brings them inside. They’re installed directly to the underside of the roof purlins or to a framed ceiling.
Visual Impact: Sleek, cool, and unequivocally industrial. It reflects light in interesting ways and creates a very cohesive look if your exterior is also metal. The strong linear pattern is a major design statement.
The Reality: Metal is durable and low-maintenance, but it’s acoustically challenging. Every sound will ring and reflect. In a kitchen or busy living area, this can be fatiguing.
It also conducts temperature, so without proper insulation directly against it, it can contribute to radiant heat loss or gain. Condensation can be a risk if the interior space is humid and the metal is cold. It’s a bold choice best used in specific zones or for homeowners who truly love that edgy, utilitarian vibe.
The Finished Feel: Flat Drywall
This is the most conventional residential approach. A flat ceiling of drywall is installed at a uniform height, creating a closed plane that hides all the structure, wiring, and insulation above. It often includes features like recessed lighting or ceiling fans.
Visual Impact: Clean, quiet, and modern. It provides a neutral backdrop that lets your furniture, art, and lighting take center stage. It makes a large barndominium interior feel more intimate and defined.
The Reality: You gain excellent acoustics and the most flexible lighting options. The attic space created above is perfect for thick batt insulation. The trade-off is you lose the sense of volume and architectural drama.
Installation over a large area is a big job, and accessing plumbing or electrical later requires cutting into the drywall. It’s the right choice if you prioritize a quiet, polished, traditional living environment over showcasing the building’s bones. This approach can be a perfect foundation for more intricate overhead focal points in key rooms.
The Hybrid Approach: Boxed Beams & Accents
Can’t decide? You don’t have to pick just one. A hybrid approach uses elements from different styles.
For example, you might have a flat drywall ceiling but add faux box beams for visual interest. Or, you could have exposed trusses in the great room but a flat, wood-plank ceiling in the bedrooms.
Visual Impact: This offers the most design flexibility. You can create definition between spaces in an open floor plan, add architectural detail where you want it, and control costs by using premium materials only as accents.
The Reality: This requires more forethought in planning. You need to decide where transitions will happen and how different ceiling heights will interact. Electrical and lighting plans become more complex.
But for creating a truly custom home that has distinct “zones” and layered interest, it’s often the most satisfying solution.
Matching Ceiling Height to Your Space (And Why It Matters)
That number on your building plans, the clearance from floor to ceiling, isn’t just a spec. It’s a primary driver of comfort and cost. Most building codes, as a baseline, require at least 7 feet of clearance in habitable rooms.
But in a barndominium, you’re almost always working with much more.
Here’s a quick guide to how ceiling height influences the feel of a room:
| Ceiling Height | Visual & Spatial Feel | Best For… | Key Consideration |
|---|---|---|---|
| 9–10 Feet | Comfortable, spacious, but not cavernous. Feels like a well-proportioned room. | Bedrooms, bathrooms, kitchens, defined living areas. | Allows for standard upper cabinets and ceiling fans without feeling cramped. |
| 12–14 Feet | Dramatic and airy. Starts to feel like a “great room.” | Main living areas, great rooms, spaces where you want volume. | Lighting must be planned for scale (e.g., hanging pendants, tall windows). HVAC must be sized to condition the larger air volume. |
| 16+ Feet | Grand and monumental. Creates a true loft or warehouse feel. | Central atriums, spaces with mezzanines, showcasing massive trusses. | Acoustics and heating/cooling become significant (and costly) challenges. Requires strategic design to feel inviting, not empty. |
The golden rule is to let function guide your height. A 16-foot ceiling in a bedroom can feel cold and impersonal, while a 9-foot ceiling in a two-story great room might feel oppressively low. Think about the human scale of the activities in each room.
Also, remember that every extra foot of height means more wall to build, more surface to finish, and more volume to heat and cool. It’s a balance between that breathtaking first impression and your long-term utility bills.
The Visual Impact on Light, Space, and Mood
Your ceiling design manipulates light and perception in powerful ways. It’s one of the most effective tools you have to shape how a room feels before you even bring in a single piece of furniture.
A light-colored, smooth ceiling (like white drywall or painted shiplap) acts like a giant reflector. It bounces ambient light around the room, making it feel brighter and more open. A dark or heavily textured ceiling (like stained wood or exposed dark metal) absorbs light.
This can make a space feel cozier, more intimate, and lower, even if the actual height is the same.
The direction of your ceiling material also plays tricks on the eye. Planks or lines running the length of a room will make it feel longer. Running them across the width makes it feel wider.
A peaked, vaulted ceiling draws the eye upward and creates a sense of grandeur, while a flat ceiling keeps the focus at eye level, which can make a large room feel more grounded and comfortable.
How Ceilings Change Your Lighting Plan
This is where your ceiling choice directly dictates your electrical budget and fixture options. You can’t just screw a standard ceiling fixture into a truss 14 feet in the air.
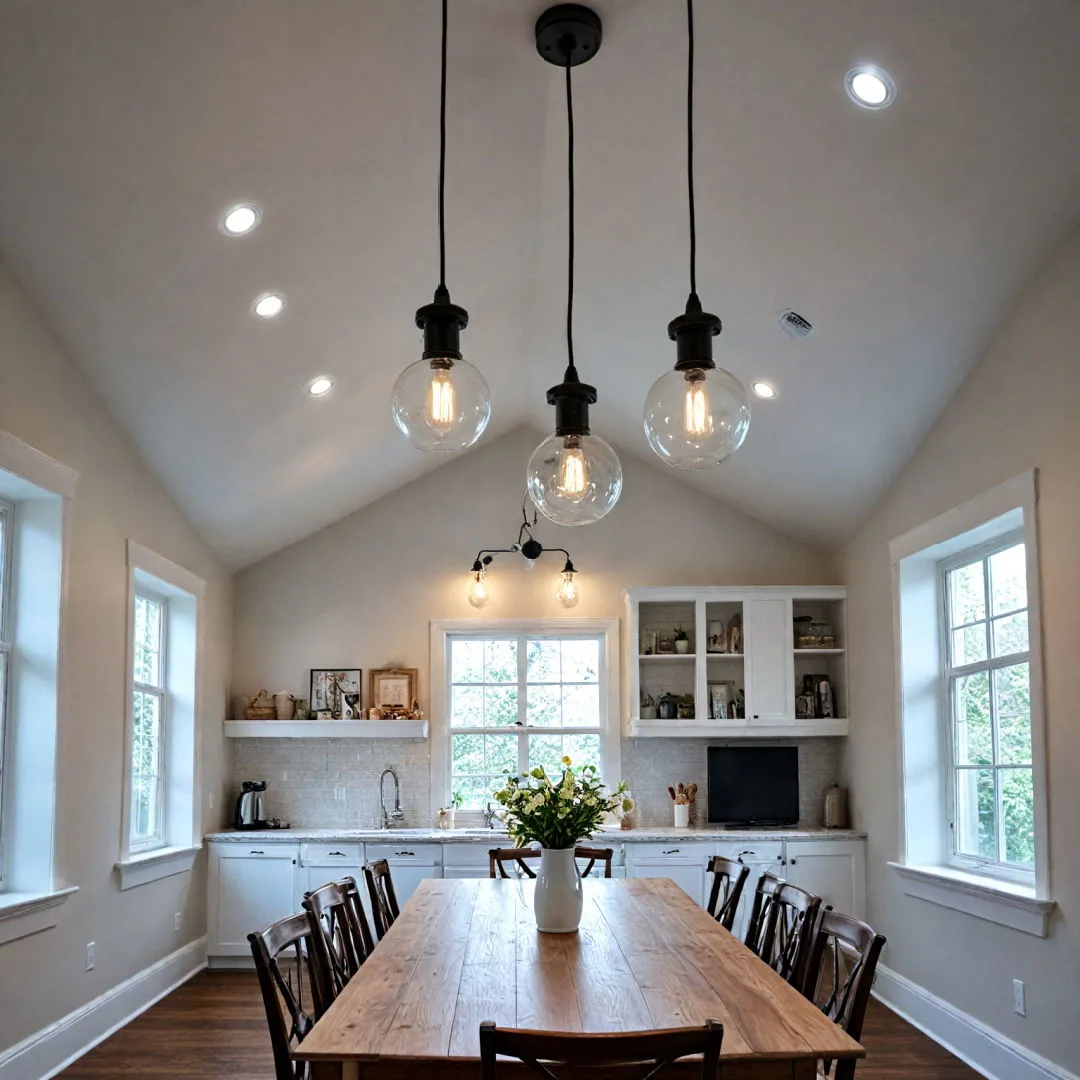
Image source: Bing (Web (fair-use with source credit))
For High & Exposed Ceilings: Your lighting will likely need to “hang down” into the space. Think long pendant lights over an island, suspended linear fixtures over a dining table, or track lighting mounted to the bottom chord of a truss. Can lights are usually off the table unless you build down a soffit.
You’ll rely more on wall sconces, floor lamps, and table lamps for ambient light. The wiring has to be planned early, often run through conduit that’s part of the design.
For Flat & Lower Ceilings: You have all the standard options: recessed can lights, flush-mount fixtures, ceiling fans, and cove lighting. This allows for a more layered, precise lighting plan with general, task, and accent lighting all integrated into the ceiling plane. It’s simpler to wire and offers more control over the light distribution in the room.
No matter the height, always plan your lighting in tandem with your ceiling design. It’s not a separate step. The two systems are completely interdependent.
Creating Illusion: Making Spaces Feel Larger or Cozier
You can use your ceiling to visually alter the proportions of a room. If a section of your barndominium feels too long and narrow, installing a ceiling treatment like beams or planks across the short width can interrupt that tunnel vision and make it feel wider. Conversely, if you have a wide, boxy room, running lines the long way can emphasize its length.
Color is your other powerful tool. Painting the ceiling a dark, moody color automatically lowers the visual plane, creating intimacy. This is a fantastic technique for bedrooms or libraries.
Painting it a bright white or matching it to the wall color (a technique called “color drenching”) blurs the boundaries, making the walls seem to disappear and the ceiling feel higher. It’s a classic trick for making small rooms feel bigger.
Acoustic Reality: From Echo Chamber to Quiet Retreat
Sound behaves very differently under a 20-foot metal roof than it does in a standard 8-foot drywalled bedroom. Hard, parallel surfaces (like a flat metal ceiling and a concrete floor) create reverberation. This is that hollow echo you hear in empty warehouses.
In a finished living space, it makes conversations hard to hear and can make the room feel noisy even when it’s not.
Your ceiling material is your first line of defense against this.
- Soft, Absorptive Materials: Drywall, wood planks, and specially designed acoustic panels absorb sound waves, reducing echo and creating a quieter, more acoustically “dead” space. This is why traditional homes feel hushed.
- Hard, Reflective Materials: Exposed metal, stained wood (which has a hard finish), and even smooth, painted drywall reflect sound. This livens up a space but can become fatiguing.
If you love the look of a hard material but hate the echo, you have to add absorption elsewhere. Plush area rugs, heavy curtains, upholstered furniture, and fabric wall hangings all soak up sound. It’s a balancing act between the aesthetic you want and the sonic comfort you need.
The Practical Trade-Offs: Cost, Insulation, and Maintenance
Let’s get into the nuts and bolts. Every beautiful ceiling photo you see has a practical backstory involving a budget, an insulation strategy, and a future maintenance schedule.
Material Cost & Installation Complexity Compared
Here’s a rough breakdown to set expectations. These are average material costs per square foot as of 2026, and installation can often double or triple the total cost depending on labor and your location.
| Ceiling Type | Avg. Material Cost (per sq. ft.) | Installation Complexity | Notes |
|---|---|---|---|
| Exposed Trusses | $0 – $5 | Low (Finish Only) | Cost is for staining/sealing trusses. The structure itself is already paid for in the building shell. |
| Flat Drywall | $1 – $3 | High | Cost includes materials (drywall, mud, tape). Labor is high due to finishing work. Requires painting. |
| Wood Plank (Pine T&G) | $3 – $8 | Medium | Material cost varies hugely by wood species (pine vs. cedar). Installation is straightforward but time-consuming. |
| Corrugated Metal | $2 – $6 | Medium | Panels are relatively light and fast to install. Cutting and finishing edges neatly requires skill. |
| Spray Foam Insulation | $1.50 – $3.50+ | Very High (Professional) | Not a finish, but a required system for many exposed ceilings. Priced by board foot (R-value). |
Remember, the sheer scale of a barndominium ceiling makes even a small per-square-foot difference add up to thousands of dollars. A DIY-friendly option like wood planks might have a higher material cost but save you a fortune on labor compared to hiring a drywall crew for a vaulted ceiling.
Insulation Strategies for Each Ceiling Type
This is the most critical technical aspect. A poorly insulated ceiling is your biggest source of heat loss in winter and heat gain in summer. Your strategy is dictated by your ceiling finish.
For an Attic Space (Above a Flat Drywall Ceiling): This is the simplest. You can roll out thick, inexpensive batt insulation (like fiberglass) between the ceiling joists in the attic. You want to achieve a high R-value (R-38 to R-60 is common for ceilings, depending on climate). The attic needs to be ventilated to prevent moisture buildup.
For an Exposed or Vaulted Ceiling (No Attic): Here, there’s no empty attic above. You must insulate the roof assembly itself. The standard, most effective method is closed-cell spray foam applied directly to the underside of the roof deck.

Image source: Web (Bing) / detroitchinatown.org (Web image (fair-use with source credit))
This creates a sealed, “hot roof” assembly. The foam provides a high R-value per inch and acts as an air and vapor barrier. It’s expensive but incredibly effective.
It also lets you keep the trusses exposed as a finished surface. The alternative, trying to fit batt insulation between the trusses and then cover it with a vented air gap, is complex and less efficient in a barndominium. For comprehensive energy-saving strategies that start with the shell, our guide on budget-conscious building touches on smart insulation choices.
Dust, Access, and Long-Term Upkeep
Think about life five years from now.
- Dust: Exposed horizontal surfaces on trusses, beams, and ductwork will collect dust. It’s a fact. If you hate dusting, a smooth, flat ceiling is easier to maintain.
- Access: Where are your electrical wires, plumbing vents, and HVAC ducts? A sealed drywall ceiling hides them beautifully but makes repairs a messy, patch-and-paint project. An exposed ceiling makes every pipe and wire accessible, which is a huge advantage for a workshop combo or for future upgrades.
- Finishes: A stained wood ceiling may need re-sealing every decade. A painted surface might need touching up. Metal is largely maintenance-free but can show scratches. Factor in the long-term care, not just the initial install.
Common Visual Mistakes (And How to Sidestep Them)
It’s easy to get caught up in inspiration photos and overlook how a design will feel in your daily life. Here are the pitfalls we see most often.
The “Too Busy” Effect in Open Floor Plans
In a vast, open great room, your ceiling is a major unifying element. If you switch ceiling styles or heights too many times within one visual space, it can feel choppy and unsettling. For example, jumping from exposed trusses to a vaulted drywall section to a low wood-plank area in a single room without clear architectural definition (like a change in wall placement) just looks messy.
The Fix: Establish zones thoughtfully. Use ceiling changes to define permanent, functional areas. The exposed trusses can soar over the central living area.
A lower, wood-plank ceiling can gently define the kitchen space without a full wall. The transition should feel intentional, like moving from one “room” to another, even in an open plan.
Getting Scale Wrong with Fixtures and Beams
This is the number one error with high ceilings. A tiny light fixture on a massive truss looks lost and silly. Conversely, a huge, heavy beam in a room with standard 8-foot ceilings will feel oppressive and claustrophobic.
The Fix: Match the scale of your elements to the volume of your space. For high ceilings, choose lighting with longer drops, larger shades, or grouped clusters. Beams should be sized proportionally to the room’s dimensions.
A good rule of thumb for faux beams: their depth should be roughly 1/12th to 1/10th of the ceiling height. A 12-foot ceiling could handle a beam 10 to 12 inches deep.
Clashing Finishes and Textures
Your ceiling doesn’t exist in a vacuum. The materials and colors need to converse with your walls, floor, and fixtures. Putting a warm, orange-toned pine plank ceiling against cool gray walls and black metal windows can create visual discord.
Using a high-gloss finish on your ceiling when everything else is matte can be distracting.
The Fix: Create a cohesive palette. Gather samples of your ceiling material, wall paint, floor stain, and cabinet finish together in the actual light of your space. See how they interact.
Generally, it’s safe to keep finishes consistent (e.g., matte on everything) or to have one deliberate contrast element. If your exterior design features a lot of metal and glass, carrying some of that industrial feel inside with a metal ceiling can create a powerful connection.
Key Considerations Before You Choose
Before you fall in love with a picture, run through this checklist. It grounds your decision in the reality of your specific build.
Your Building’s Core Structure (Truss Type & Clear Span)
You can’t always get the ceiling you want. Your building’s engineering comes first.
- Truss Type: Standard “W” trusses have a large horizontal bottom chord. If you leave them exposed, that chord becomes a visual band at a set height. Scissor trusses have bottom chords that angle up, creating a vaulted shape inside. You need to know which you have or are willing to pay for.
- Clear Span: The width of your building without interior support columns. Wider spans often mean larger, more visually dramatic trusses. A 40-foot clear span with massive timber frames offers a different aesthetic possibility than a 30-foot span with lighter engineered trusses.
Your builder or building supplier can tell you what’s standard or what’s possible within your budget. This is the first constraint on your design.
Primary Use: Pure Living Space vs. Workshop Combo
How you’ll use the space is the ultimate guide. A barndominium that’s 100% dedicated living space can prioritize acoustics and fine finishes. One that combines a garage workshop with the living quarters has different needs.
In a shop-home, durability and easy access might trump perfect acoustics. An exposed, spray-foamed ceiling in the workshop area is practical. You might then transition to a warmer, sound-absorbing wood ceiling in the adjacent living room.
The function of each area should lead the design.
Design Style: Rustic, Modern, Industrial, or Farmhouse?
Your ceiling is a massive contributor to your overall style. Be honest about the look you’re after.
- Rustic/Farmhouse: Wood planks, shiplap, exposed natural wood trusses.
- Modern: Flat drywall, crisp lines, vaulted volumes, maybe sleek metal accents.
- Industrial: Exposed everything, trusses, metal decking, conduit, spray foam.
- Transitional: A hybrid, like box beams on a flat ceiling or painted shiplap.
Your ceiling should feel like a natural extension of the style you’re creating on your walls and with your furniture. It’s the capstone of the theme.
Your Budget Reality: Frame, Finish, and Future
Be brutally honest here. Tally not just the material cost, but:
- Installation Labor: Can you DIY it? If not, get quotes.
- Insulation Cost: The spray foam required for exposed styles is a major line item.
- Lighting & Electrical: Rewiring for pendants or can lights adds up.
- Long-Term Costs: Higher ceilings mean higher heating/cooling bills.
It’s better to execute a simpler design flawlessly within your budget than to overextend on a complex one that gets cut corners or left unfinished.
Navigating Codes and Practical Limits
You can’t design in a vacuum. Your local building department and the laws of physics have the final say.
Minimum Ceiling Height Requirements
The International Residential Code (IRC) is the model most localities follow. It states that habitable rooms must have a minimum ceiling height of 7 feet. Bathrooms, hallways, and laundries can be 6 feet 8 inches.
For sloped ceilings (like under a vault), at least 50% of the room’s floor area must have a 7-foot ceiling, and no portion used for living space can be below 5 feet.
Always, always check with your local building inspector. Some areas have amendments, and they are the ultimate authority for your permit. Don’t assume the national code is your local code.
Safety with Hanging Loads and Electrical
Anything you hang from your ceiling, a light fixture, a fan, a swing, must be securely attached to structural framing. You can’t just screw a heavy pendant into drywall or the bottom of a truss chord without proper backing. For fans, you need a rated fan box anchored to a joist or truss.
Electrical wiring in exposed ceilings often needs to be in conduit (metal or PVC) for protection and to meet code, which changes the look and cost. All of this needs to be planned before the ceiling goes up, not as an afterthought.
Ventilation and the “Hot Roof” Dilemma
This is a crucial technical point. In a traditional attic, ventilation (soffit vents and ridge vents) allows moisture to escape, preventing mold and rot in the roof sheathing. When you spray foam directly to the roof deck for an exposed ceiling, you create an unvented “hot roof” assembly.
This is an approved method, but it must be done perfectly. The closed-cell foam itself acts as the vapor barrier. If any gaps are left, or if the building has significant interior moisture (from showers, cooking, etc.), that moisture can get trapped against the cold roof deck and condense, leading to hidden rot.
This is why using a licensed, experienced spray foam installer is non-negotiable for this approach. Resources from organizations like the U.S. Department of Energy provide in-depth explanations of unvented roof assemblies.
Expert Tips for a Cohesive Look
These are the little details that separate a good design from a great one.
Using Paint and Stain to Unify or Contrast
Don’t be afraid to paint wood. Painting trusses or planks a unifying white, black, or charcoal can modernize the space and make the architectural lines pop against a wall color. Staining allows the wood grain to show but gives you control over the tone, from light ash to dark walnut.
A pro tip: if you have exposed metal ductwork or beams, consider painting them the same color as the trusses or ceiling. This makes them recede as a unified architectural element rather than standing out as individual, clashing components.
Integrating Ductwork, Conduit, and Mechanicals Beautifully
In an exposed design, your HVAC ducts and electrical conduit are part of the decor. Plan their layout with the same care as your furniture arrangement. Can they run in straight, parallel lines?
Can they be painted a bold color to become a deliberate feature instead of an afterthought? Sometimes, building a simple soffit or chase to contain a cluster of mechanicals in one area is cleaner than having them spiderweb everywhere.
The Power of a Focal Point
In a large room with a big ceiling, create one clear focal point. This is often where your lighting investment goes. A stunning, large-scale chandelier or a series of dramatic pendants over the dining table gives the eye a place to land.
It anchors the volume of the room and provides a sense of human scale. Without it, the space can feel impressive but impersonal.
Your Decision Guide: Finding Your Ceiling Match
Let’s bring it all together. Ask yourself these questions in order:
- What’s my budget for the entire ceiling system (insulation + finish + labor)? This will immediately narrow your field.
- What is my building’s structure (truss type, height)? This defines what’s physically possible.
- What’s the primary feel I want (cozy, airy, industrial, rustic)? This points you to a material family.
- How important are acoustics and easy maintenance to me? This can rule options in or out.
- Do I need future access to utilities above the ceiling? This leans you toward exposed or hybrid designs.
Your answers create a filter. You might start loving the idea of exposed scissor trusses, but if your budget won’t cover the premium for scissor trusses and spray foam, a beautiful wood-plank ceiling on a standard frame might be your perfect, attainable match. The goal isn’t the most expensive or dramatic ceiling, it’s the one that best fits your building, your life, and your wallet.
Frequently Asked Questions
How much does it cost to finish a barndominium ceiling?
Costs vary wildly based on size, material, and labor. As a very rough range, expect to spend between $2,000 and $15,000 or more for a typical great room ceiling. A DIY pine plank ceiling might be at the lower end, while a professionally installed, spray-foamed vaulted drywall ceiling will be at the higher end.
Always get multiple quotes based on your specific plan.
What is the best insulation for a barndominium with an exposed ceiling?
For ceilings with no attic space (exposed trusses, vaulted), closed-cell spray foam applied directly to the underside of the roof deck is the most effective and common solution. It provides high R-value, seals air leaks, and acts as a vapor barrier. It’s a professional-grade job but solves the insulation challenge for good.
Can you drywall a barndominium ceiling?
Absolutely. Drywall is a very popular choice for creating a clean, modern, finished look and excellent acoustics. The challenge is the scale and height.
Installing and finishing drywall on a high or vaulted ceiling requires special equipment (lifts) and skill. It’s often more expensive than other options due to the labor involved.
How high should a barndominium ceiling be?
There’s no single answer. For living areas, 10-14 feet is common to achieve an open feel. Bedrooms often work well at 9-10 feet for coziness.
Your ceiling height should be a deliberate design choice based on the room’s function, your truss type, and your budget, while always meeting the local code minimum of 7 feet for habitable rooms.
Is a metal ceiling a good idea in a barndominium?
It can be, but know the trade-offs. A metal ceiling is ultra-durable and low-maintenance with a distinct industrial look. However, it is very reflective of sound, which can create echo, and it can feel cold.
It works best in combination with other sound-absorbing materials (rugs, furniture) and in climates or on buildings where its thermal conductivity is managed with proper insulation.
How do you hang lights from a high barndominium ceiling?
For ceilings over about 10 feet, you typically use pendant lights or chandeliers with long suspension cables or rods that drop the fixture into the living space. Track lighting mounted to a truss or beam is another option. Wiring must be planned early and often needs to run in conduit.
Standard ceiling-mounted “boob” lights or low-hanging fans are rarely suitable for these volumes.
Real Scenarios: What Ceiling Works Where?
Let’s put these ideas into practice with some common barndominium floor plans. Visualizing how a ceiling design functions in a real layout helps cement the concepts.
The Open-Concept Shop & Home Combo
This is the classic 60/40 or 70/30 split, where a large workshop or garage shares space with living quarters. The challenge is defining zones without building walls.
The Hybrid Solution Works Best Here. Run exposed, spray-foamed trusses over the entire workshop bay for durability and access. At the dividing line, transition to a lower, finished ceiling in the living space. A wood plank or flat drywall ceiling here creates an acoustic and visual barrier.
Use the change in ceiling height and material to naturally signal “you are now in the house.” This keeps the open feel while providing domestic comfort where you need it.
The Pure, Airy Living Space
Your barndo is a dedicated home, no workshop. You want it to feel bright, spacious, and modern.
Vaulted or Exposed Scissor Trusses are top contenders. Both maximize the sense of volume. For a cleaner, quieter look, go with a vaulted drywall ceiling painted a bright white. It reflects light beautifully and offers the best acoustics for a family home.
If you love the structural honesty, choose exposed scissor trusses. Have them sprayed with a light-touch foam and painted a uniform color. This gives you the drama with slightly more controlled acoustics than raw metal.
A layout like this pairs perfectly with a focus on interior decor that complements those high lines.
The Cozy, Cabin-Inspired Retreat
The goal is warmth, intimacy, and rustic charm. You might have a smaller footprint or want to emphasize comfort over grandeur.
Wood Plank Ceilings are your friend. Install tongue-and-groove pine or cedar across the entire ceiling plane, even if it’s flat. The wood instantly warms the space and absorbs sound. For a lower ceiling height (9-10 feet), consider a beadboard ceiling for even more texture.
Stain the wood in a warm tone or paint it a soft, matte white to keep the room bright. This approach turns the ceiling into a giant, cozy canopy that makes the space feel like a snug hideaway, a perfect foundation for earthy, layered decor.
The Final Walkthrough: Your Pre-Installation Checklist
Before any material is ordered or the first nail is driven, run through this list. It catches costly oversights.
- Electrical & Lighting Plan Signed Off: All junction boxes, fan rough-ins, and conduit paths are marked on the plans. You know where every switch and fixture goes.
- Insulation Strategy Finalized & Quoted: You have a firm quote from your spray foam contractor or know exactly what R-value batt insulation you’re installing in the attic.
- Mechanical Rough-Ins Complete: All HVAC ducting, plumbing vents, and gas lines that will run above or through the ceiling are fully installed and inspected.
- Material Samples Approved: You have physical samples of your ceiling material, stain, and paint. You’ve seen them in the actual space at different times of day.
- Local Building Inspection Scheduled: You know when the rough-in inspection for electrical and framing needs to happen before you close up the ceiling.
- Access Points Planned: You’ve decided where and how you’ll create access panels to any shut-off valves or electrical junctions that will be concealed.
Missing any of these steps can lead to expensive tear-out and rework. It’s the boring paperwork that makes the beautiful result possible.
Troubleshooting Common Post-Installation Issues
Even with perfect planning, things can pop up. Here’s how to address typical problems.
“My High Ceiling is an Echo Chamber”
You installed a beautiful vaulted metal ceiling, and now every conversation sounds like it’s in a gymnasium. This is an acoustic issue, not a structural one.
Solutions:
- Add Area Rugs: Large, thick rugs on the floor are the fastest way to absorb sound reflections.
- Install Fabric Elements: Heavy curtains, upholstered furniture, and fabric wall hangings all soak up sound waves.
- Consider Acoustic Panels: Stylish, fabric-wrapped acoustic panels can be mounted high on walls or even to the ceiling trusses themselves. They’re designed to blend in while fixing the problem.
“Dust is Collecting Everywhere on the Exposed Beams”
This is the inevitable trade-off for the exposed look. Regular dusting is part of the maintenance.
Make it Easier:
- Use a long-handled microfiber duster or a vacuum with a soft brush attachment.
- Consider using a satin or matte finish on the wood, which shows dust less than a high-gloss finish.
- A good HVAC filter changed regularly can reduce the overall dust load in the air.
“There’s a Draft/ Temperature Difference Near the Ceiling”
This points to an insulation or air-sealing problem. In a spray-foamed roof, it could be a thin spot or gap. In an attic, it could be insufficient insulation or missing air baffles.
Action: For a spray foam job, contact the installer. They can use a thermal camera to spot missing insulation. For an attic, check the depth and coverage of your batt insulation.
Make sure it’s not compressed and that it covers the entire ceiling plane evenly.
Your Next Steps: From Planning to Reality
You’ve done the research. Now it’s time to act. Start by sketching your floor plan and literally drawing in your ceiling lines.
Use online visualizers or simple software to get a feel for the volume.
Collect three quotes for any professional work (spray foam, drywall, electrical). The variation will educate you. Finally, order samples.
Hold that piece of corrugated metal or that wood stain sample in your space. Live with it for a few days.
Your barndominium ceiling is a lasting legacy of your build. Taking the time to choose thoughtfully, plan meticulously, and execute carefully ensures it’s a feature you’ll admire for decades, not a regret you learn to ignore. It’s the final, defining layer that turns a building into your home.
Maintenance & Long-Term Optimization
Your ceiling isn’t a set-it-and-forget-it feature. A little proactive care keeps it looking and performing its best for years. The regimen changes based on your material.
For exposed wood trusses or planks, dusting is the main task. Use a long-handled duster monthly. Every few years, inspect the finish.
If water stains appear or the wood looks dry, a light sanding and fresh coat of clear sealant or stain may be needed.
A drywall ceiling needs almost no routine maintenance, but watch for cracks. Small hairline cracks at seams can appear as the building settles. These are simple to patch and repaint.
Larger cracks could indicate a structural issue and need a professional assessment.
Metal ceilings are the easiest. An occasional wipe with a damp cloth removes dust. Check for any signs of condensation, especially at fasteners, which could point to an insulation gap.
Wrapping Up: Confidence in Your Ceiling Choice
You’ve walked through the styles, the trade-offs, and the real-world implications. You know that the right barndominium ceiling design isn’t about picking the prettiest picture. It’s about aligning an architectural statement with your daily life, your budget, and your building’s bones.
The goal is a ceiling you don’t just see, but one you feel good under. It should make your space work better, whether that means containing sound for movie night, showcasing grandeur for guests, or simply making your workshop easy to maintain. Trust the process you’ve just learned.
Start with your needs, filter through your constraints, and you’ll land on a choice that’s uniquely right for your barndominium.
Your home’s fifth wall is waiting. Now you have the blueprint to finish it brilliantly.