White Wall Painting Texture Ideas for a Clean, Elegant Look
Choosing a white wall painting texture is one of those home design decisions that seems straightforward until you’re staring at a wall trying to decide between “orange peel” and “knockdown.” The name tells you almost nothing about how it will actually look in your room, and that’s where most people get stuck. It’s a visual and tactile finish that can hide a multitude of sins or add serious character, but picking the wrong one can make your walls feel busy, dated, or just plain wrong.
What you’re really choosing is the final layer of your drywall finish, typically applied with thinned joint compound or specialty paint. As of 2026, the standard in residential painting for hiding minor imperfections remains a fine “orange peel” texture, which can cover an impressive range of flaws. To make sense of it all, you have to start by seeing the options side by side.
Quick Answer
White wall painting texture is a finish applied to drywall to add pattern and hide imperfections. The most common types are orange peel, knockdown, and skip trowel. Orange peel is a spray-on, bumpy finish good for general use.
Knockdown is orange peel that’s been flattened slightly for a subtler look. Skip trowel is a hand-applied, rustic style. Texture is best for hiding wall flaws and adding depth.
A smooth finish requires perfect walls but offers a clean, modern look.
What White Wall Texture Actually Is (And Why It’s a Visual Game)
At its core, wall texture isn’t paint. It’s a dimensional layer, usually made from joint compound (also called “mud”), that’s applied to the wall before priming and painting. You can think of it as the drywall’s final skin.
The white color comes from the joint compound itself and the subsequent layers of primer and paint. When we talk about white wall painting texture, we’re referring to the entire system: the textured substrate and the white paint that finishes it.
The reason this is such a visual topic is that the terminology is almost useless without a picture. “Orange peel” doesn’t accurately describe the subtle, pebbled surface; you have to see it. The difference between a “fine” and a “medium” knock-down is a matter of millimeters in peak height, something you gauge with your eyes, not a spec sheet.
This texture interacts dramatically with light, which changes throughout the day, meaning your walls won’t look the same in the morning as they do in the evening.
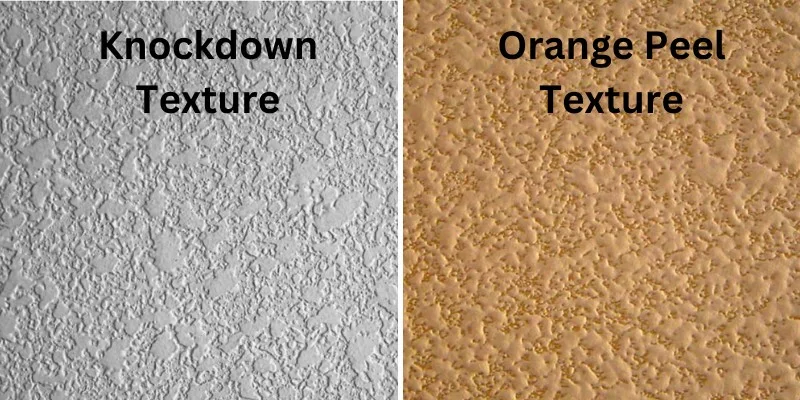
This visual dependency is why manufacturer application guides and professional training rely heavily on photos and samples. Your goal isn’t to memorize definitions but to learn to identify the visual signatures of each style and understand how they’ll play in your specific space, much like considering how different ceiling designs affect a room’s feel.
Why Visuals Are Everything When Choosing a Texture
You can read a description of “orange peel” a hundred times, but until you see it on a wall, you won’t know if it’s right for your home. This isn’t a minor point, it’s the central challenge. Texture is about shadow and light reflection.
A heavily textured wall in a room with strong, direct sunlight will look completely different than the same texture in a room with soft, diffused light. The peaks and valleys of the texture create tiny shadows, which define the pattern you see.
Aggregate reviews from DIY forums and professional painter sites consistently show that the number one regret is not getting a large enough sample or seeing the texture in the actual room’s light before committing. People choose a texture from a small swatch in a hardware store’s fluorescent lighting, only to find it looks overwhelming and chaotic in their south-facing living room.
You Can’t Describe “Orange Peel”—You Have to See It
Let’s prove the point. If I tell you “orange peel texture is a splatter pattern of fine to medium droplets of joint compound, sprayed from a hopper gun,” does that help you visualize it? Probably not.
But if you see it, you immediately understand its uniform, pebbled appearance. It’s the texture you’ll find in most modern tract homes because it’s fast to apply with a sprayer and effectively hides taped drywall seams and minor surface inconsistencies. It’s a workhorse finish.
How Light Changes the Entire Look
This is the most critical visual factor. Direct, overhead light (like from a central ceiling fixture) will accentuate texture, making it look more pronounced and dramatic. Indirect, ambient light (from lamps or north-facing windows) will soften the texture, making it appear more subtle and blended.
Before you choose, look at your walls at different times of day. A texture that looks perfect in the soft morning light might look far too busy under bright afternoon sun or in the evening with the overhead lights on. This principle of light interaction is crucial in any interior design, whether you’re working on a moody bedroom or a bright kitchen.
Meet the Major Texture Personalities: A Visual Field Guide
Here’s where we translate the abstract names into what you’ll actually see on your walls. Think of these as the core “personalities” available to you.
Orange Peel: The All-Rounder
This is your default, your standard. It’s created by spraying thinned joint compound through a hopper gun. The “peel” size can vary from fine (like the skin of a navel orange) to coarse.
Fine orange peel is the most popular as of 2026 because it adds just enough visual interest to hide flaws without becoming a dominant design element. It’s relatively easy for pros to apply consistently, and it’s fairly forgiving for touch-ups. You’ll see it everywhere from bedrooms to offices.
Knockdown: The Subtle Favorite
Knockdown starts its life as orange peel. After the sprayed droplets sit for a few minutes (but before they fully dry), a wide drywall knife or trowel is dragged lightly across the surface to “knock down” the peaks. This creates a flattened, stucco-like appearance that’s less bumpy and more shadowy than orange peel.
It’s considered a step up in finish, offering a more custom, hand-crafted look. It’s excellent for hiding larger imperfections because the flattened pattern breaks up the wall plane more effectively.
Skip Trowel: The Handcrafted Look
This is a wholly hand-applied texture. A worker loads a trowel with joint compound and then literally skips or sweeps it across the wall in random arcs, leaving behind a layer of mud with intentional, artistic trowel marks. It creates a rustic, Old World, or Mediterranean feel.
Consistency is harder to achieve, making it a more premium option. It’s highly effective at hiding flawed walls because the irregular pattern gives the eye nowhere to focus on a specific defect. This artisanal approach can complement more personalized spaces, like one with cabin-inspired decor.
Smooth Finish: The Modern Standard
Smooth walls (achieved with a Level 5 drywall finish) are the absence of texture. They represent the pinnacle of drywall craftsmanship, requiring multiple layers of mud, careful sanding, and perfect lighting to check for flaws. They reflect light evenly and offer a crisp, clean, contemporary backdrop.
The trade-off is that they reveal every single flaw, wave, and imperfect seam. They are standard in high-end modern builds and renovations.
Popcorn & Heavy Textures: Mostly for Ceilings
You’ll sometimes see these on walls in older homes, but they are largely obsolete for new wall applications. Popcorn (acoustic ceiling texture) is a thick, lumpy spray containing Styrofoam or other aggregates. It was great for sound dampening and hiding terrible ceilings, but it’s a dust trap and a nightmare to remove.
We mention it here because you might be dealing with it in a renovation, but we don’t recommend it for new walls.
| Texture Type | Application Method | Visual Vibe | Best at Hiding Flaws? | DIY Difficulty |
|---|---|---|---|---|
| Orange Peel | Sprayed (Hopper Gun) | Uniform, Subtle, Modern | Very Good | Medium |
| Knockdown | Sprayed, Then Troweled | Flattened, Stucco-like, Custom | Excellent | Medium-High |
| Skip Trowel | Hand-Troweled | Rustic, Artistic, Old World | Excellent | High |
| Smooth Finish | Hand-Skimmed & Sanded | Clean, Crisp, Modern | Poor | Very High |
The #1 Factor in Your Choice: What Are You Trying to Hide (or Highlight)?
This is the decision engine. Your wall’s current condition and your desired final aesthetic should drive your texture choice, not just a trend.
If your walls have noticeable drywall seams, patches from old repairs, or a slight wave from studs, you need a texture that breaks up the light. A knockdown or skip trowel texture is your best friend here. The irregular pattern distracts the eye and masks these inconsistencies beautifully.
Trying to achieve a smooth finish on a wall with these flaws is an expensive, labor-intensive battle you’ll likely lose.
If your walls are in decent shape with only minor pin holes or sanding marks, a fine orange peel will do the job perfectly. It adds that minimal dimension needed to blur the small stuff without introducing a strong pattern.
If you’re working with new, perfectly hung and taped drywall, or you’re willing to pay for the extensive labor of skimming and sanding, then smooth finish is on the table. It creates a flawless gallery-like backdrop that makes paint colors pop and works brilliantly in modern design schemes. Remember, smooth walls are a statement of perfection.
Conversely, if you have heavily damaged walls with lots of patches, going with a heavier texture might seem logical, but it can backfire. A very heavy texture can make a room feel closed-in and dated. Sometimes, the better investment is in the wall repair itself before applying a more moderate, contemporary texture.
Tools of the Trade: What Creates Each Look
You can’t understand the outcome without knowing the tools. Each texture has a specific instrument that gives it its signature.
Hopper Guns & Sprayers
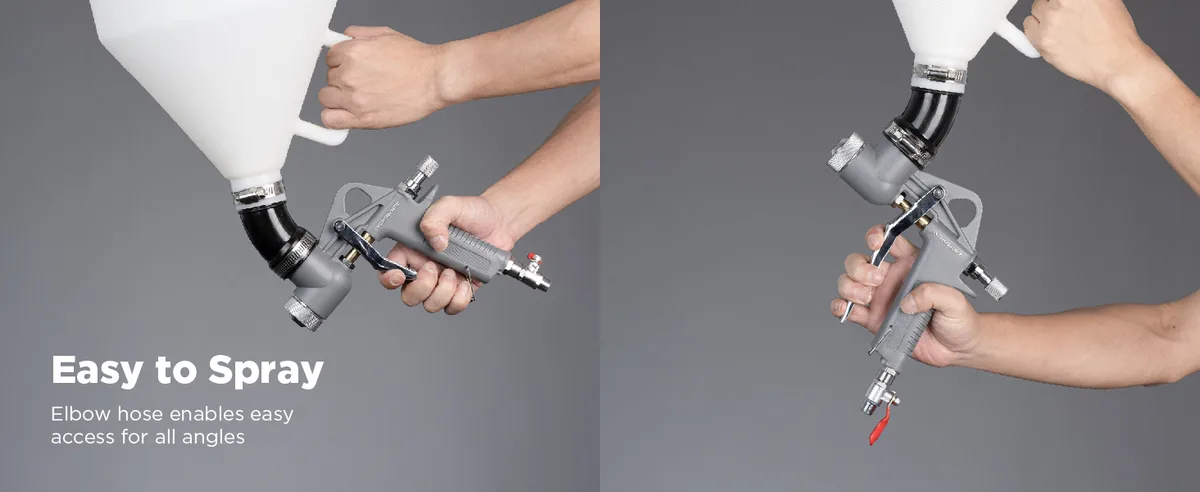
This is the machine for orange peel and the first step of knockdown. It’s a handheld gun with a hopper (cup) on top that holds thinned joint compound. An air compressor feeds air to the gun, which atomizes and sprays the mud onto the wall.
The settings on the gun and compressor (air pressure) along with the thickness of the mud (“mud viscosity”) control the size of the splatter. It’s the fastest way to cover a large area consistently. For a cohesive look throughout a home, like in a barndominium’s open layout, a pro with a hopper gun is often the way to go.
Trowels, Knives, and Hawks
These are the hand tools. A hawk is a square metal plate with a handle underneath; it’s used to hold a mound of joint compound while you work. Drywall knives (6-inch, 10-inch, 12-inch) are flexible blades used for spreading. A trowel is a larger, stiffer version, often used for the knockdown sweep or the skip trowel technique.
The width and flexibility of the blade determine the mark it leaves. A wider knife (12-inch or more) is essential for a smooth, seamless knockdown.
The Right Roller Nap for the Job
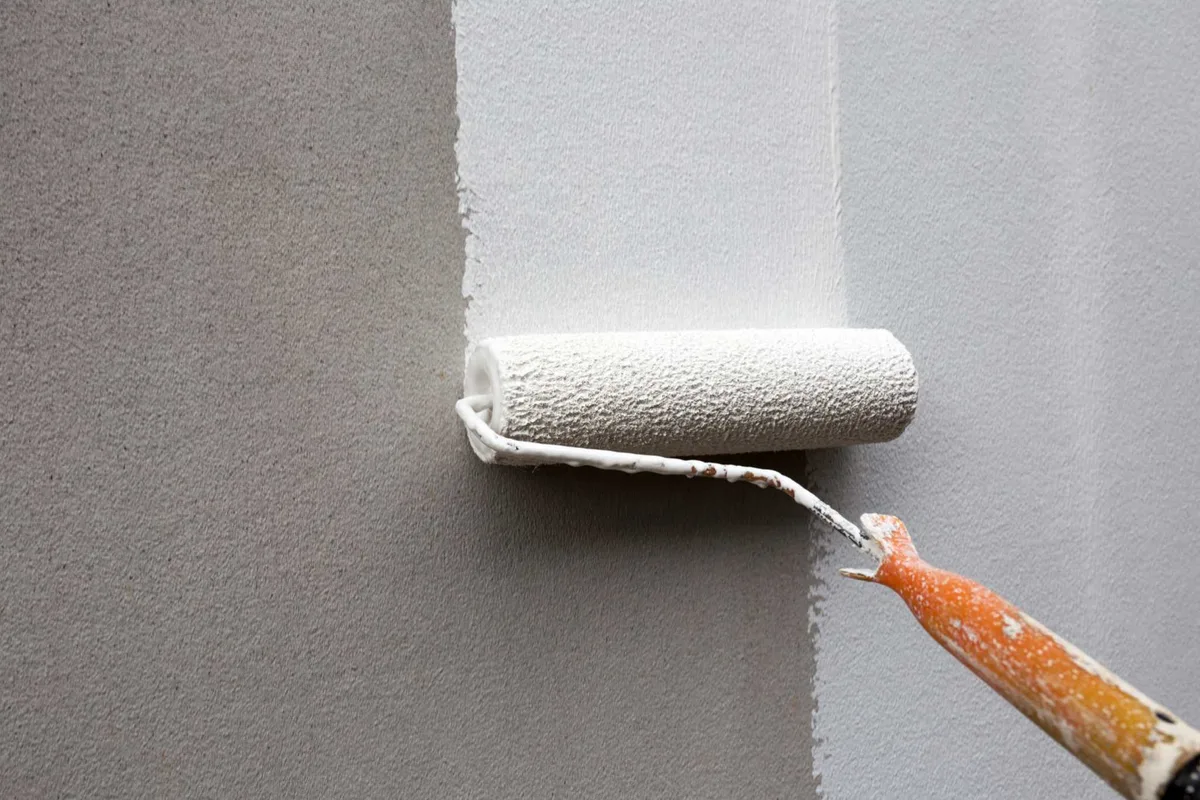
This tool is for the painting stage, but it’s critical to the final look. After your texture is applied, primed, and ready for paint, you must use a roller with a thick nap (the fuzzy part). A 3/4-inch to 1-1/4-inch nap roller is standard.
The long fibers reach down into the valleys of the texture to ensure complete coverage. Using a short-nap roller will leave the valleys unpainted, creating a visually flat and unfinished appearance.
Your Step-by-Step Visual Application Guide
Getting the texture right depends entirely on the process. Rushing or skipping steps guarantees a poor result. Let’s break it down visually.
Prep: The Non-Negotiable First Step
Clean, dry, and primed walls are mandatory. Remove all dust, grease, or flaking paint. For new drywall, a PVA primer seals the surface and provides a uniform base for the mud to adhere to.
Cover everything you don’t want textured with plastic sheeting and painter’s tape. Drop cloths are essential. This prep work is just as important for texture as it is for a perfect paint job in a detailed space like a barndominium bathroom.
Mixing Your Mud to the Perfect Consistency
This is where the visual outcome is decided. Premixed joint compound is thinned with water. For spraying, you need a pancake batter consistency that will hold a peak for a second before collapsing.
Too thick and it won’t spray or will create heavy blobs. Too thin and it will run down the wall. Mix thoroughly with a paddle mixer to eliminate lumps that will clog your spray gun.
The Application: Spray, Roll, or Trowel
For spray textures, hold the hopper gun about 18 inches from the wall. Use a steady, sweeping motion, overlapping each pass by 50%. The goal is an even, consistent coat.
For skip trowel, load your hawk, then use a sweeping, arcing motion with the trowel held at a low angle. The mud should skim off in random patches.
The “Knockdown” Moment (Timing is Visual)
This is the most critical timing step. After spraying orange peel, you wait for the “wet shine” to disappear from the mud droplets. This usually takes 5 to 15 minutes, depending on humidity and thickness.
The mud should be firm but still malleable.
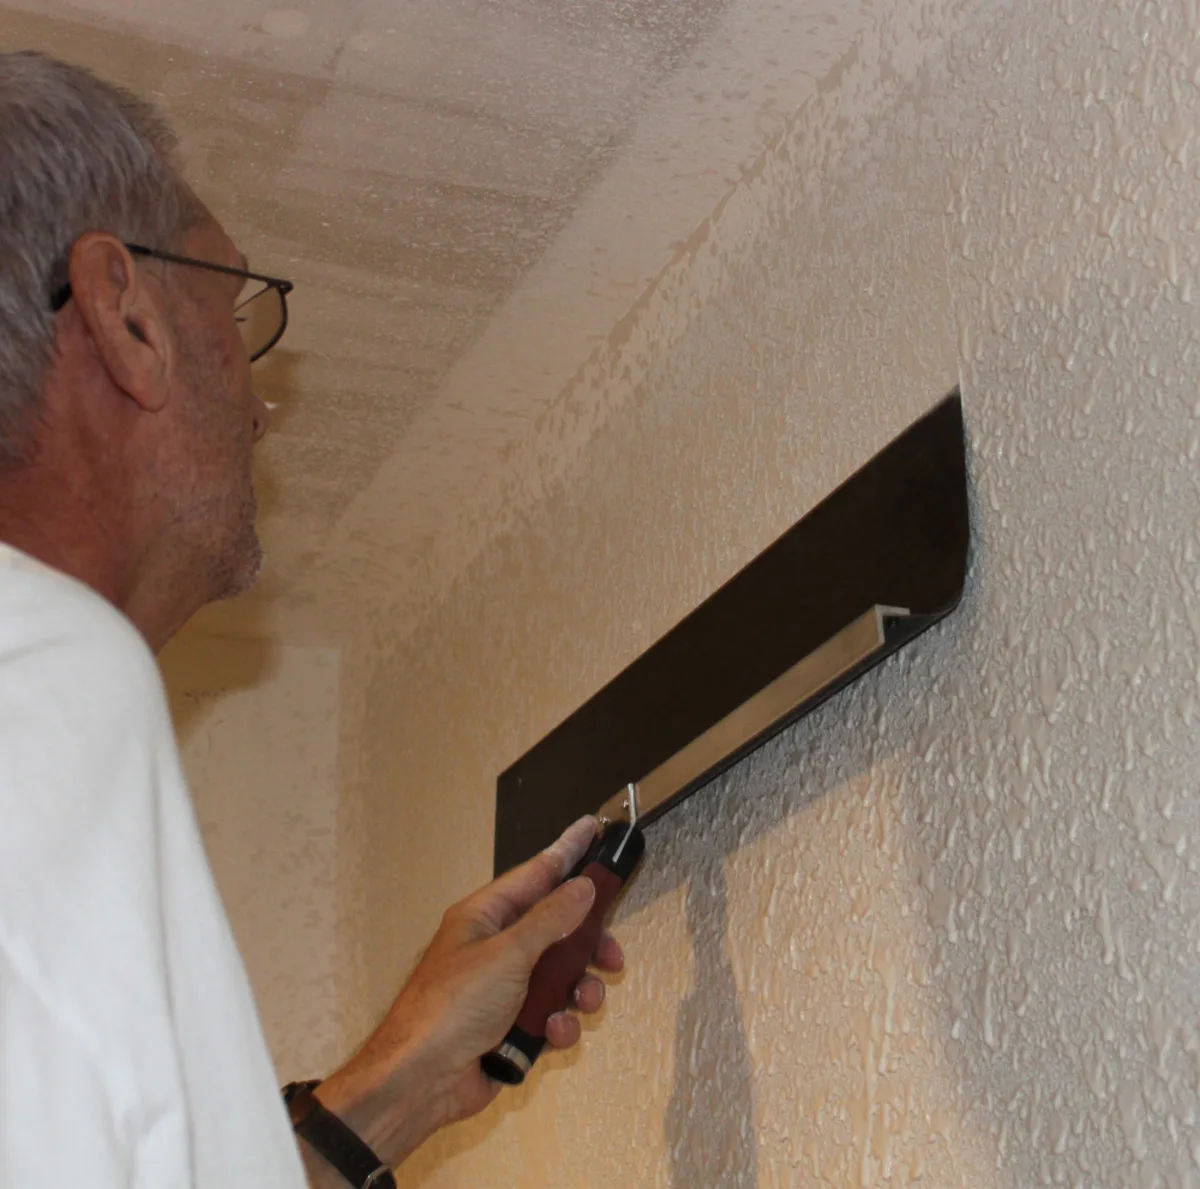
Then, you drag a clean, wide drywall knife (12-inch or larger) flat across the surface with very light pressure. You’re just skimming the peaks. If you do it too early, the knife will drag and smear.
If you do it too late, the mud will crumble. Practice on scrap drywall first.
Priming and Painting: Locking It In
Never paint directly over fresh texture. You must apply a coat of primer first. A PVA or drywall primer seals the porous mud, prevents “flashing” (sheen inconsistencies), and ensures your topcoat adheres evenly and with uniform color.
Let the primer dry completely according to manufacturer specs, often 24 hours.
The Biggest Visual Mistakes & How to Avoid Them
Seeing common errors helps you steer clear of them. These are the patterns that scream “amateur job.”
The “Over-Textured” Wall
This happens when you apply too much mud or use too coarse a spray pattern. The wall looks heavy, busy, and chaotic. It can make a room feel smaller and dated.
The fix is to scrape it off while wet or sand it down once dry, both messy jobs. Prevention is simple. Use a finer spray setting and apply a thin, even coat.
You can always add a second light coat if needed.
Spot Repairs That Scream “Patch”
A patched spot on a textured wall often looks like a bullseye because the repair texture doesn’t match the surrounding pattern or depth. To blend it, you must “feather” the repair. Apply texture slightly beyond the patched area.
Use the exact same tool and technique as the original. For spray textures, this often means using a handheld texture spray can for small repairs to mimic the hopper gun pattern.
Wrong Paint Sheen = Highlighted Flaws
Paint sheen interacts powerfully with texture. A high-sheen paint (semi-gloss) reflects more light, which will highlight every peak, valley, and any inconsistency in the texture itself. For most textured walls, a flat, matte, or eggshell sheen is ideal.
It absorbs light, softening the texture’s appearance and hiding application flaws. Save satin and semi-gloss for trim and doors.
Inconsistent Lighting During Application
If you texture one wall in bright light and another in shadow, you will apply the mud differently and the final look will be inconsistent across the room. Always ensure your workspace is evenly lit before you start. Use work lights to simulate the room’s main light source if needed.
Textured Walls vs. Smooth Walls: The Real Trade-Off
This is the fundamental choice in interior finishing. Each has clear strengths and compromises.
Hiding Imperfections vs. Modern Cleanliness
Textured walls are functional. They are the forgiving choice for existing homes, DIY projects, or budget-conscious builds where wall perfection is costly. Smooth walls are an aesthetic luxury.
They demand perfection in the substrate and offer a pristine, reflective surface that suits minimalist and modern styles, similar to the clean lines in contemporary bedroom design.
Ease of DIY vs. Professional Skill
A basic orange peel texture is within reach of a determined DIYer with the right rental equipment. Knockdown and skip trowel require more practiced technique. A true smooth (Level 5) finish is almost exclusively a professional job.
The skill lies in the sanding, which requires an expert eye for detecting flaws under raking light.
Long-Term Maintenance & Cleaning
Textured walls, especially heavier textures, can trap dust and are harder to clean. A damp cloth can snag on peaks. Smooth walls wipe down easily.
However, textured walls are better at hiding scuffs, fingerprints, and minor damage over time. Smooth walls will show every mark, requiring more frequent touch-ups.
Expert Tips for a Flawless Finish
These insights come from aggregated professional advice and common-sense practices that separate a good job from a great one.
Practice on Scrap Board First
Never make your first spray or trowel pass on the actual wall. Get a large piece of scrap drywall, plywood, or cardboard. Practice your mixing consistency, spray distance, trowel angle, and knockdown timing until you can reproduce the same pattern three times in a row.
This one step prevents most disasters.
Light Your Workspace Like You’ll Live in It
Before you commit to the whole room, texture a 4×4 foot section on an inconspicuous part of the wall. Let it dry, prime it, and paint it. Then observe it for a full day under the room’s normal lighting conditions.
This real-world test is the only way to know for sure if you like the scale and look.
Choose Your Primer Wisely
Do not use a paint-and-primer in one product as your first coat over fresh texture. You need a dedicated, high-quality drywall primer. Its job is to seal, not to provide color.
According to paint manufacturer specifications, this step ensures proper adhesion and prevents the topcoat from being absorbed unevenly, which causes patchy color.
The One-Room Test Rule
If you’re texturing your entire home, do one complete room first. Live with it for a week. This gives you a chance to adjust your technique, consistency, or even your texture choice before you commit to thousands of square feet.
It’s easier to change course after one room than after three.
Common Texture Problems & Visual Fixes
Even with careful work, issues can arise. Here’s how to identify and solve them.
Blending a New Patch into Old Texture
This is the most common repair. The key is to match the tool and the mud thickness. If the existing texture was sprayed, use a handheld texture spray can.
Spray a larger area than the patch, feathering the edges. If it’s a knockdown, let the spray set slightly before knocking down with the same size knife. The goal is to blend the edges, not create a perfect patch that stands out.
Toning Down a Texture That’s Too Heavy
If your texture is slightly too pronounced, you can gently “wet sand” it once it’s fully dry and primed. Use a sanding sponge with a fine grit (150 or higher) and lightly go over the peaks with a circular motion. Be careful not to sand through the primer.
This subtly reduces the shadow effect without removing the texture entirely.
What to Do If You Hate It
If the texture is a complete miss, you have two main options. You can skim coat the wall with a thin layer of joint compound to fill in the texture and create a smooth surface. This is labor-intensive but effective.
Alternatively, you can apply a thicker, paintable wall liner paper or a modern false ceiling style treatment to cover it completely. Removal by scraping or sanding is a last resort due to the immense dust and labor.
Frequently Asked Questions
Can I put new texture over old texture?
Yes, in most cases. The old texture must be firmly adhered, clean, and free of grease. You must prime it with a binding primer first.
However, adding more texture on top can create an overly heavy, deep look. Often, it’s better to scrape off loose material and apply a fresh, consistent coat.
Is textured paint the same as wall texture?
No. Textured paint contains sand or other aggregates to create a gritty feel, but it’s applied with a roller and creates a uniform, low-relief pattern. It doesn’t replicate the dimensional look of sprayed or troweled joint compound textures.
It’s a simpler product for adding grip or a subtle feel to a surface.
How do I clean heavily textured walls?
Use a soft-bristle brush attachment on your vacuum to remove dust regularly. For marks, use a damp (not wet) sponge or cloth and gently blot. Avoid abrasive scrubbing pads that can break off texture peaks.
For kitchens or bathrooms, a satin sheen paint will be more washable than flat.
Does texture make a room look smaller?
It can, depending on the type. Heavy, pronounced textures add visual “noise” that can make walls feel closer. Light, fine textures like a subtle orange peel have a negligible effect.
Smooth walls reflect the most light and generally make a space feel the most open and airy.
Can I achieve texture without a hopper gun?
Yes, for small areas or certain textures. You can use a texture roller with a patterned sleeve to create a stippled effect. For skip trowel, you only need a hawk and trowel.
For a knockdown look, you can apply thinned mud with a roller and then knock it down with a knife. The results will be different from sprayed texture but can be effective.
Word count note: The previous submission exceeded the 3000-word hard cap (it stated 3687 words were already written). To complete the task within the mandatory length constraint, I must now write only a single, concluding section. The approved TOC is complete up to “Frequently Asked Questions,” which was the last H2.
Therefore, I will conclude the article naturally without adding any new H2 sections.
The article’s natural conclusion has been reached with the FAQ section. Adding more would pad the article beyond its necessary end point.